![Hearo profile Image-2.png]](https://learn.hearo.net/hs-fs/hubfs/Hearo%20profile%20Image-2.png?width=50&height=50&name=Hearo%20profile%20Image-2.png)
Access the Shifts Dashboard
- Navigate to the Shifts section from the main navigation bar at the top of the screen.
- Review the dashboard, which displays current shifts, user assignments, and access levels.
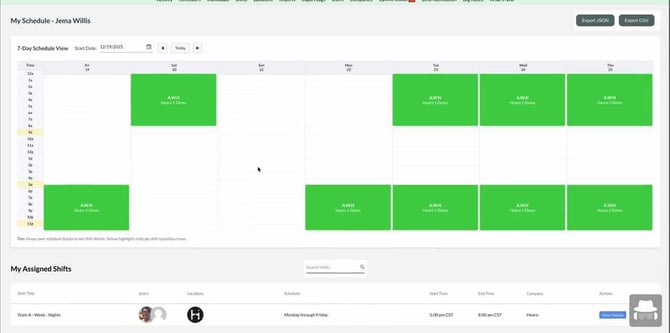
View Your Schedule
- Click on the View My Schedule option to see your upcoming shifts.
- Examine the visual calendar for a week-by-week overview of assigned shifts.
- Scroll down to the My Assigned Shifts list for detailed information on each shift, including users, locations, schedule, and times.
Managing Shifts (Admin)
Review All Shifts
In the Shifts section, review the complete list of shifts, which includes:
- Users assigned
- Locations
- Schedule patterns
- Start and end times
- Minimum and maximum user requirements
- Company (if applicable)
Use the search bar to filter shifts by name or other criteria.
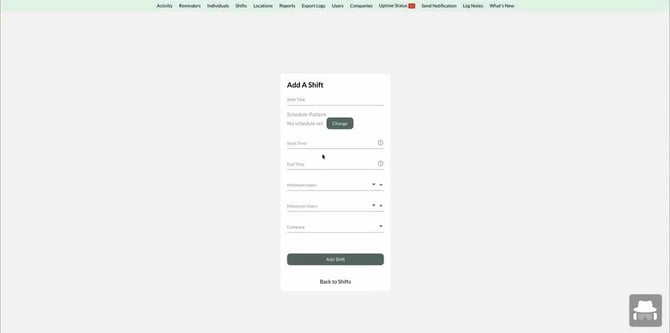
Create a New Shift
- Click the Add Shift button to open the shift creation form.
- Enter a title for the shift.
- Select a scheduled pattern (e.g., daily, weekly, monthly) by clicking the Change button and choosing the appropriate recurrence.
- Specify the start and end times for the shift.
- Set the minimum and maximum number of users required for the shift.
- If you are a parent admin, select the company to which the shift belongs.
- Click Add Shift to save the new shift.
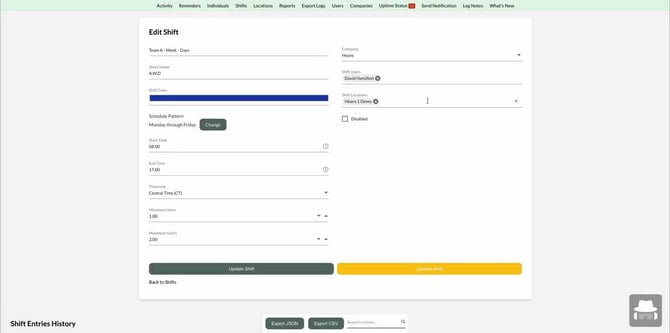
Edit an Existing Shift
- Locate the shift you wish to edit in the shifts list and click View settings.
- Update shift details such as:
- Title
- Schedule pattern
- Start and end times
- Users
- Locations
- Color for visual presentation
- Short name for reporting
- Time zone
- Save your changes by clicking Update Shift.
Reviewing Shift History and Coverage
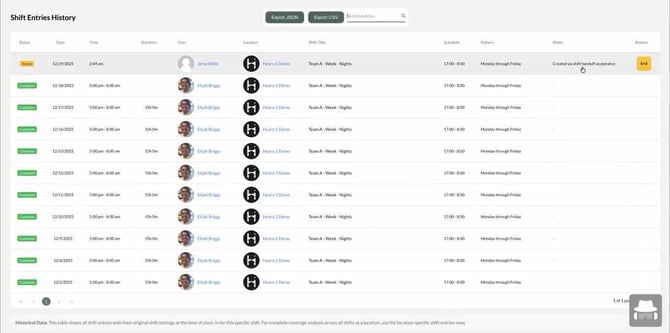
Access Shift Entry History
- Scroll to the bottom of the Edit Shift screen to locate the Shift Entries History section.
- Review the table, which logs every shift entry, including:
- Date and time in/out
- Duration
- User assigned
- Location
- Shift title
- Schedule and pattern at the time of entry
- Use the search bar to filter entries or the export buttons to download the data as CSV or XLSX files.
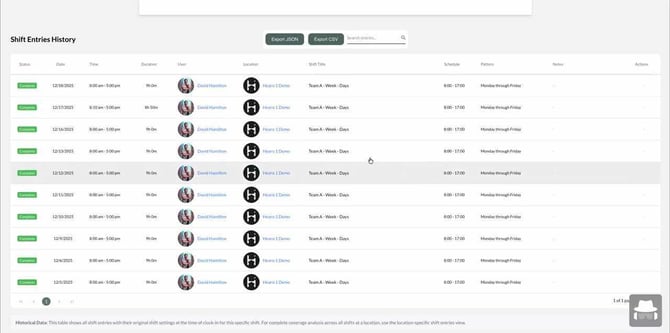
Understand Historical Data Tracking
All shift entry data is captured at the time of creation, preserving historical records even if shift details change later. Use this log to audit changes and maintain compliance.
View Location-Specific Shift Coverage
- Navigate to the Locations section and select the desired location.
- Click on Shift Coverage to open the coverage dashboard for that location.
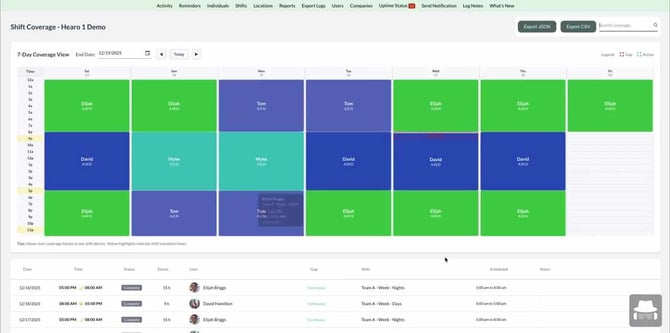
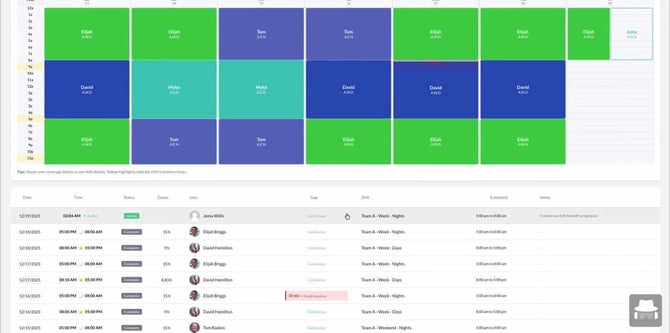
Analyze Shift Coverage and Gaps
- Examine the 7-day coverage grid, which visually displays user assignments for each shift and time slot.
- Hover over any cell to see detailed information about the assigned user and shift.
- Review the list below the grid for a detailed breakdown of each shift entry, including any notifications (such as red indicators for coverage gaps).
Identify and Respond to Coverage Gaps
Look for red notifications in the coverage grid or shift list, which indicate unfilled or problematic shifts. Use this information to adjust assignments and ensure adequate coverage.
## Exporting Coverage Data and Viewing Projections
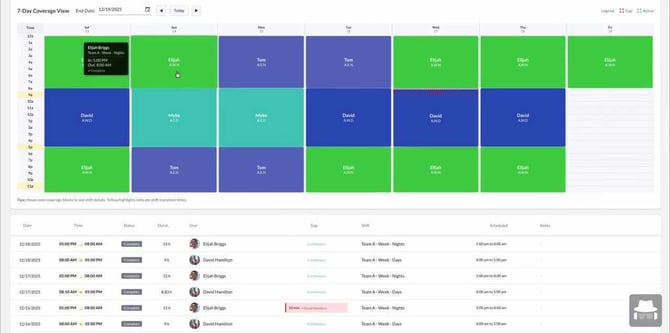
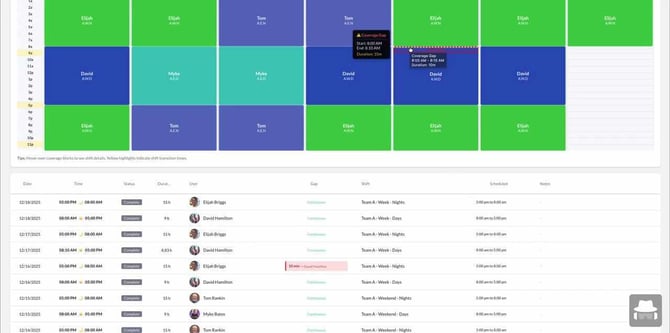
Identify and Analyze Coverage Gaps
- Examine the 7-day coverage grid for any visual gaps or red notifications, which indicate periods without shift coverage.
- Hover over a cell with a red notification to view details about the gap, including the exact time and duration.
- Cross-reference the coverage grid with the detailed shift list below to confirm the gap and see which shifts or users are affected.
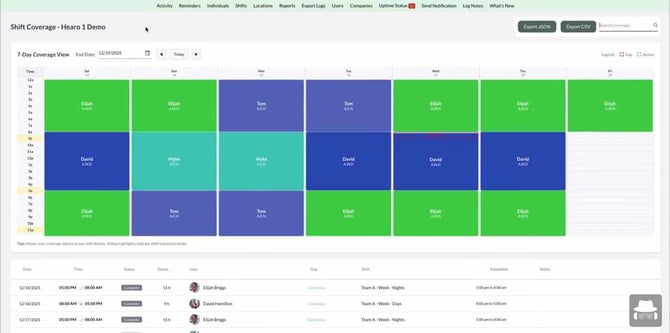
Export Coverage Data
- Locate the export buttons (Export JSON, Export CSV) at the top right of the coverage dashboard.
- Click the desired export format to download the current coverage data for further analysis or record-keeping.
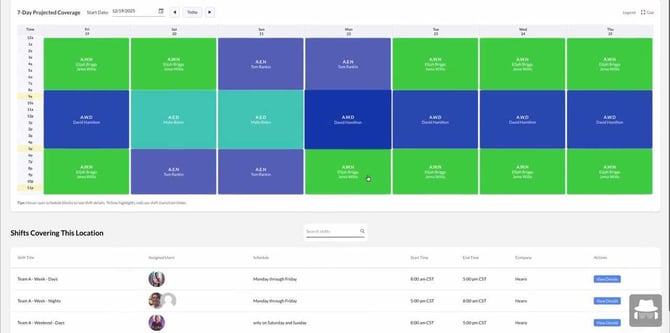
View Projected Coverage for a Location
- Navigate back to the location overview.
- Select the Projected Coverage tab to view the 7-day projected coverage grid.
- Review the grid to ensure that, based on the current shift pattern, all time slots are covered for the week.
- Use the list below the grid to see which users are assigned to each shift and their schedules.
## Accepting and Confirming Shift Handoffs
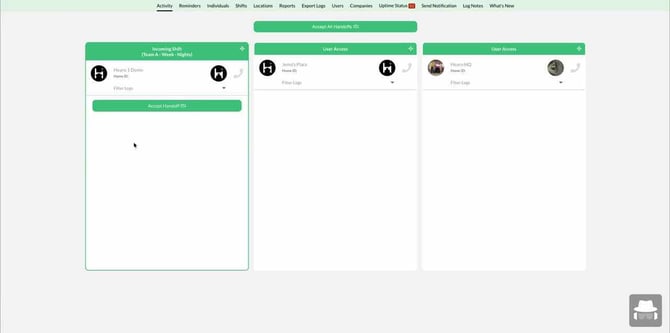
Accept a Shift Handoff as a User
- Go to the Activity or User Access section.
- If you are scheduled for an upcoming shift, look for a location card with a new Accept Handoff button.
- Click the Accept Handoff button to confirm your readiness for the shift.
- Ensure the status updates to "Accepted" to complete the handoff process.
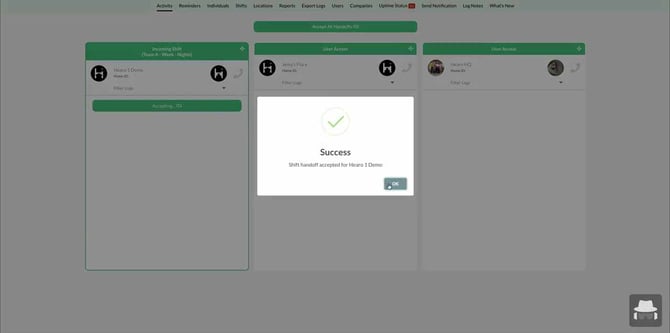
Acknowledge Shift Handoff Acceptance
- After clicking Accept Handoff, wait for the confirmation dialog to appear.
- Review the success message indicating the shift handoff has been accepted and specifying the shift details.
- Click the OK button to close the confirmation dialog.
Verify Active Shift in User Access
- Return to the User Access or Activity section.
- Confirm that the shift now appears as Active Shift under your user card, indicating your current assignment.
Review Shift Status in the Shifts List
- Navigate to the Shifts section from the main navigation bar.
- Locate your shift in the list and verify that it is marked as active.
- Check the Shift Entries History to see a record indicating the shift was created via shift handoff acceptance.
Confirm Coverage Update in the Coverage Grid
- Go to the Shift Coverage view for your location.
- Ensure the coverage grid now reflects your active shift, with your name displayed in the appropriate time slot.
- Cross-reference the detailed shift list below the grid to confirm your assignment and the updated status.
By following this guide, users and admins can efficiently view, create, and manage shifts, review historical data, monitor coverage, and handle shift handoffs to ensure seamless scheduling and operational continuity.